Wednesday, August 12, 2015

Birthday Presents & Challenges

One of my co-workers, Terry,  had a birthday this week, and I couldn't wait to make her a pretty notebook to go with these great flower pens I found at Staples. I found these great little kraft coloured notebooks at the Dollar Tree awhile ago, and went back to get more for this project. Unfortunately, they only had three left; I sure hope they get more.


I pulled out my retired stamps, Pick A Petal, to make big beautiful daisies in the background. My new Larger Than Life Alphabet stamps that arrived this week, just in time to make this pretty book! I embossed the letters and the flower center in white EP. I felt that it needed just a little something more, so I went scrounging and found the cute little bee in a very old set, In Full Bloom. That was actually one of the first sets I ever purchased after discovering Stampin' Up! Unfortunately, it's difficult to see behind the light reflecting off the ripple in the plastic wrap. I cut the label section off the package the book came in, and slid my new pretty book back inside. I added ribbon, the pen, and the little matching daisy birthday card, and voila! -a pretty little gift! And even greater than my joy of making it, was seeing Terry's delight when she received it.

Thanks to the wonderful ladies who attend my card making classes each month, I have been placing orders quite regularly, and having a lot of fun with all of my new toys!

Along with the Larger Than Life Alphabet set, I've also recently purchased the new background stamp, Writing Notes, and the Bold Butterflies Framelits. I decided to try them out for two challenges this week. Unfortunately I don't seem to make enough time to participate in challenges as often as I'd like, but I actually had a couple days off work this week and had lots of time to play! One of my favourite challenges online is SU Only Challenges.  This week's challenge was to use butterflies. I actually did two cards today. The first one fits their criteria, and the second combines this challenge with another at Addicted to CAS, which was to use banners on a CAS card. I hope I'm allowed to submit two entires!


Ok, I am seriously in love with this alphabet! I thought it would look cute on the Writing Notes background, and I think I was right. I wish my 'F' had been a bit closer to the 'O', but I try to reign in my perfectionism from time to time, and let it be. (I lied- the more I look at it, the more it is really driving me nuts!) 
I stamped the background with Soft Suede ink on Crumb Cake CS, embossed the letters in white EP, just like the notebook, and added 'you' with chocolate chip ink. The 'you' is from the Endless Birthday Wishes stamp set. I just love being able to see through the photopolymer to place my stamps exactly where I want them. The butterfly is die cut from Crushed Curry, with rhinestones added to the body for some bling.


My entry for the Addicted to CAS challenge, uses the same background, but cut down to a small banner. I stamped the sentiment with the Endless Birthday Wishes photopolymer set. I layered the banner on top of our Tea Lace Paper Doilies, and added a butterfly cut from Tempting Turquoise. After adding the rhinestones to his body, I felt there was something missing, so I added three more in the bottom right corner.

Thanks for looking!
Chris

Sunday, August 9, 2015

February Card Class - I'm on a Roll!

So, yes, I am pretty proud of myself. I'm really on a roll with my blog now, and I think it's okay to be proud of myself. I set out to do something that I felt was important, and I'm doing it. I know my friends appreciate seeing what I've been up to, and I hope you do too. It shouldn't take me long to catch you all up, and get to what I've been doing recently. So here's what we did in February:

February was the last month that we did five cards. We were just finding it too difficult to get them finished- we were going too late, and getting too tired. It didn’t help that many of us had worked a full day, and then had to work the next morning also.

So here's the group of them; we did mostly birthday cards this month. I guess that's what I was in the mood for. :-)

I love CAS, and it’s so easy for the new stampers. CAS cards don’t actual have to look simple- they’re just simple to create. This is handy when you have a limited time frame for the class. Clean and simple cards can still have a great wow factor, as you can see with this butterfly card. I used my circle framelit dies to create a mask out of simple copy paper, and stamped the Hardwood Background in Basic Grey. The butterfly was stamped from the 25th Anniversary set, Best of Butterflies, and cut out by hand. I coloured the butterfly with my wonderful Blendabilities markers. Unfortunately due to a flaw in the manufacturing process, Stampin’ Up felt they had to discontinue them. Hopefully they will find a way to bring them back soon; I know a lot of people are anxiously awaiting that. The sentiment is from a retired sentiment set, Words of Wisdom. And for the wow factor (besides the bright Rich Razzleberry butterfly against the white background), I added a row of pale pink rhinestones to his body. When adding cut out butterflies to my cards, I always glue them down at the body only, allowing the wings to pop up off the card, for a beautiful effect. I stamped “happy birthday” inside from the retired hostess set, Express Yourself.

I don’t know what’s happened to me, but this past year I have fallen in love with yellow! I even bought a yellow pillow to go on my red couch! It’s pretty great.  :-)
Now, I love yellow and grey combos the most, but for this pretty birthday card, I chose a yellow and blue combo. The card base is So Saffron,  and the patterned piece is from the Subtles DSP Collection. The Night of Navy panel has been cut with the Scalloped Edge border punch. The presents are from the Retired Christmas set, Wishing You, and are coloured with Night of Navy, So Saffron, and Marina Mist markers. It is popped up with foam lifters. The sentiment from the Sale-a-bration set, Big Day, is coloured with another set of Blendabilities markers, with rhinestones added for some sparkle.

Our second birthday card is done with a cake image from embellished Events, and a sentiment from the retired set, Curly Cute, which I hope makes a comeback someday- it’s a fabulous set! I coloured the cake using my SU markers, and cut it out. Using my two way glue pen, I added some dazzling diamonds glitter to the cake stand and flames. It is popped up using some foam lifters, on top of two strips of wash tape. I carefully masked off each half of the sentiment, stamping them separately to allow the sentiment to be broken into two separate lines. The white panel was then added to the So Saffron card base.

I just love this retired hostess set, Hello Love- the birds are adorable! You can’t really see it, but I wanted to give the Real Red card base, a bit of texture, so I stamped the retired Just Jeans background in Cherry Cobbler ink. It’s quite difficult to see in person also; even the girls didn’t notice it there. Maybe I should have used a darker ink. I used my corner rounder punch to cut the two corners of the white and black card stocks, and then stamped the images. I used a black fine tip pen to draw sewing lines on, and coloured my pretty birdie with my watercolour brush and my Bermuda Bay ink pad. Inside the card, I used the birthday greeting, but the girls had the option of using any sentiment in the set- for a birthday, baby, or wedding.


And lastly, we have this great card I CASE’d using the Guy Greetings stamp set. The card base is Crumb Cake, with real red and chocolate ship panels. The lights card stock is Naturals Ivory, which I am very sad to say, has been discontinued. It was always a great CS to use for a vintage feel. The hate were stamped in Chocolate Chip, the sentiment in Real Red. I added texture to the Chocolate Chip panel using the Gorgeous Grunge stamp set. I just love this card- such a great masculine card! 


Ok, I think I’ve said enough for one day, and the hubby is waiting for me to go watch 24 with him- we’re addicted! 
Thanks for looking, have a great day!
Chris.


Thursday, July 30, 2015

Paper Pumpkin Sale!

Stampin' Up! is currently running a great sale- half off your first two months of a Paper Pumpkin subscription for new subscribers!


Don't know what Paper Pumpkin is? Well, basically, it's a pretty little box that is mailed to you each month, with everything inside to create your own beautiful projects! Past kits include party banners, treat bags, brag books, and card of course! Paper Pumpkin is the perfect way to give Stampin' Up products a try- products are all-inclusive, quick and easy to assemble, and comes at a great price! Plus, you'll have the stamps and ink spots to continue to use again and again!
Check out a couple of this year's kits:


You can also check out more on Stampin' Up's Pinterest board, devoted to Paper Pumpkin projects.

Interested in taking advantage of this great deal? Head on over to PaperPumpkin.com to join! Enter the promo code, HALFOFF, and be sure to list me as your demonstrator!

I better get going now- I have to get ready for tonight's card making class!
Have a great day, and happy stamping!

Chris

Tuesday, July 21, 2015

Storing Stampin' Up Dies

So, if you've ever purchased any of Stampin' Up's wonderful Framelit dies, you know they come in a great plastic envelope for storing them in. I store them in a pretty little basket given to me as a birthday gift from a great friend. But you also know that they are simply adhered to a thin piece of cardboard with some strong double sided adhesive tape. That's great for shipping, but not for everyday use. The first time you try to use a die, you feel as though you're going to snap it in half while trying to remove it from the adhesive. And once you've used them a few times, the adhesive has worn down, and doesn't hold the dies in place any longer.
Well, sometime ago, I found a wonderful solution that someone shared online. Magnet sheets! So, off to the dollar store I went. And I must tell you, all magnetic sheets are not created equally! The first sheets I found were flimsy, and didn't really have much strength to hold the dies in place as I slid them in and out of the envelope during use. I found much stronger sheets at our Dollar Tree in the craft section. I just trimmed them down to size with my large counter-top Fiskars cutter, and added the Framelit dies.

Now, I was so happy with my creation, but there was one little problem- whenever I went looking for a set of dies, I found it very difficult to read the names on the envelopes. Today, I finally got around to doing what I've had in mind for a few days- I pulled out the 'liquid paper'!, Ok, it's not called that anymore, I know, but old habits die hard, as they say. So I grabbed my roll of 'white out' and rolled away- doesn't it look great?! Now I can easily read the names. I'm one happy stamper!


So, last time I admitted that I'm not so great at this blogging thing. But look at me-back again two weeks later, just as I had hoped! Of course, I have an entire day off work to thank for it. Now, I'm obviously on a roll- hope I keep it this way! February's Card Class cards will be coming soon!

See you then!
Chris


Tuesday, July 7, 2015

January's Card Class Cards

So clearly I am a terrible blogger.... I keep telling myself that I will do better, but somehow, life keeps getting in the way. Actually, my family often teases me, calling me the most disorganized organizer they know! I think if I had unlimited resources, and no need to go to work, I'm sure I could prove them wrong! But alas, I do not....so things get set aside till  I can take care of them later.... whenever 'later' may I arrive.
So now it's later, and I have finally taken some pictures of the cards from the last six months worth of card classes. My goal is to share one month every couple of weeks through the summer, so that I will be all caught up when it is time to share the cards from September's class. I sure hope I can do it!

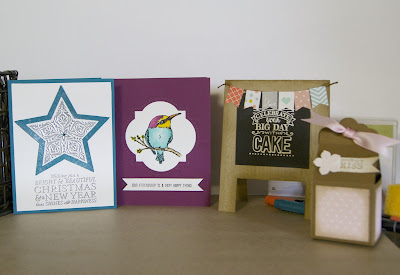
So here are January's cards!

  Some girls didn't make it for the Christmas cards in December, so I chose to make another one with them in January. I fell in love with the bird from 'A Happy Thing' set in this year's Sale-a-bration flyer from Stampin' Up! I couldn't wait to use it! Another fabulous freebie was the 'Big Day' set, used on the easel card. And lastly, I made the cute little Valentine treat box using my Simply Scored Scoring Tool.


A card idea I found on Pinterest- silver embossed on white, on an Island Indigo card. The little turquoise rhinestone matched perfectly in the centre of the star! The centre star is stamped from the 'Bright & Beautiful' set from Stampin' Up's 2014-2015 Holiday catalogue. The stars were cut with my Star framelits, and the indigo star was spritzed with smooch spritz spray to make it sparkle.


I saw several of these easel style cards on Pinterest, and knew I had to make one! I stamped the Hardwood  background onto Crumb Cake CS, and cut legs out. I sponged the edges with Crumb Cake ink as well. I punched the cute little banners with the Banner Punch out of old DSP from last year, and Whisper white, which I stamped on. The sentiment was heat embossed with white EP, on black CS, and added to the front of the easel.


The window in the Rich Razzleberry card was cut with the retired Window Frames dies. I added the white panel with the stamped image behind the Razzleberry, from the inside, but later had the class cut their white with the die instead. I didn't like the look of the white on the inside of the card. I don't know if you can see it in the picture, but I also pierced around the window using my paper piercing stencil.


This cute little box was so fun to make- the girls loved it! I cut a strip from Soft Suede CS, and made two smaller pieces to form the sides. I used my Simply Scored Scoring Tool to mark the fold lines. I punched the pretty tops with the Scalloped Tag Topper Punch.
I added the flower from Petite Petals, and added the sentiment from the retired Petite Pairs set.

I love that the sentiment says "sending a kiss", and inside the box is a giant Hershey's Kiss!

I hope you enjoyed looking!
Stay tuned for February's cards soon!